Your Setup Position Matters More Than You Think
I see a lot of dart players using what I call the "Position 1" setup - arm extended, reaching toward the board, trying to line up the dart tip with the target. It looks like it should work. It doesn't.
I used to throw this way. Then I switched to a compact setup position (Position 2) and immediately hit a 180 within 5 minutes. Not because I got lucky - because the setup position fundamentally changed my mechanics.
Here's what most players get wrong about the setup phase, and why your pause point physically matters more than almost anything else in your throw.
The Two Setup Positions
Let me describe the two most common setup positions I see. One works. One doesn't.
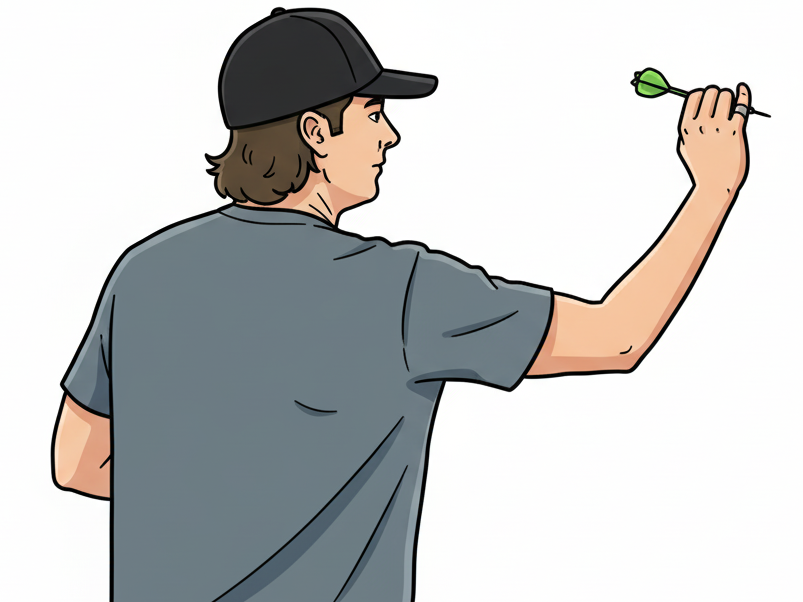
Position 1: Extended Setup (What Most Players Do)
What it looks like:
- Arm mostly extended toward the board
- Dart held far from your body
- Elbow is relatively straight (not locked, but not bent much)
- You're "reaching" toward the target
- Looks like you're pointing at what you want to hit
What it feels like:
- You can see the dart tip and the target in the same visual line
- Feels like you're aiming by lining up the dart
- Natural instinct says "this must be right - I'm pointing at it"
Why players use this:
- Seems logical (point at target = aim at target)
- You can visually "line up" the dart tip
- Looks like what you think aiming should look like
Why it fails:
- Long lever = more variance - Extended arm creates a long lever from shoulder to dart, amplifying any tiny deviation
- Hard to hold steady - Try holding your arm out straight for 10 seconds vs bent at 90 degrees - which is easier?
- Long backswing required - You're already extended, so pulling back to throw means a long travel distance = more variance
- Forces visual aiming - You're trying to "line up" the dart tip instead of trusting body alignment
- Tiring - Extended position fatigues your shoulder/arm faster
- Encourages lunging - When you realize mid-throw it doesn't feel right, you lunge forward trying to "help" it
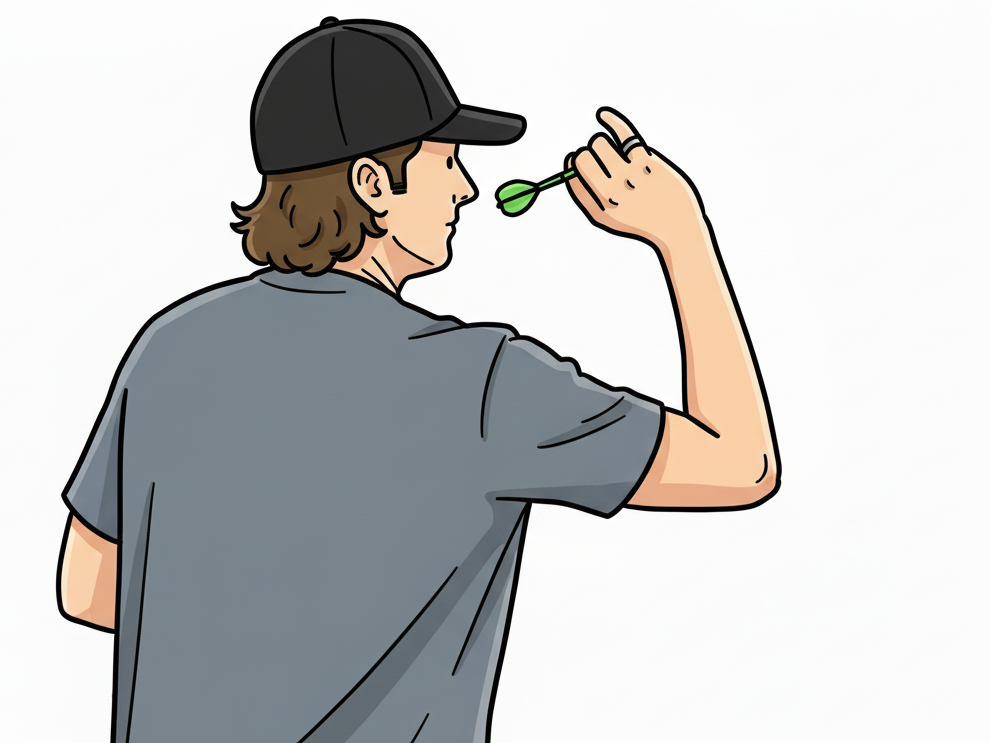
Position 2: Compact Setup (What Actually Works)
What it looks like:
- Elbow bent approximately 90 degrees (varies by player, but bent not extended)
- Dart held near your body at eye level (or slightly above/below)
- Compact position
- Looks like you're "loading" the throw, not pointing
What it feels like:
- Dart is close to you, not reaching
- Stable, easy to hold
- You can't really "line up the dart tip" visually - you have to trust your body
- Feels like there's room to move
Why this works:
- Shorter lever = more control - Less distance from shoulder to dart = less amplification of small errors
- Easy to hold steady - Bent arm position is naturally stable
- Short backswing = less variance - Arm is already loaded, minimal pullback needed before release
- Forces trust in body alignment - You can't rely on visual "dart tip aiming" so you learn to trust your setup
- Less fatigue - Compact position doesn't tire your arm
- Prevents lunging - Stable position = smooth throw, no need to compensate
The Mechanics Breakdown
Let's get into why Position 2 physically works better.
Lever Length and Error Amplification
Imagine a door hinge. If you push on the door near the hinge (short lever), it barely moves. If you push at the far edge (long lever), it swings wide.
Your elbow is the hinge. The dart is the far end.
Position 1 (extended):
- Long lever from elbow to dart
- Any tiny wobble in your elbow or forearm gets multiplied
- 1mm deviation at the elbow = 5mm+ deviation at the dart tip
Position 2 (compact):
- Shorter lever from elbow to dart
- Tiny wobbles have less effect
- 1mm deviation at the elbow = 2mm deviation at the dart tip
Physics doesn't care about your intentions. Shorter lever = tighter grouping.
Muscle Stability
Your muscles work better in certain positions than others. Try this:
- Hold your arm straight out in front of you for 30 seconds
- Now hold your arm bent at 90 degrees for 30 seconds
Which was easier to hold steady?
Extended position (Position 1):
- Your shoulder muscles are working to hold your arm up against gravity
- Muscles fatigue quickly
- Micro-tremors increase as you fatigue
- Harder to maintain exact position
Bent position (Position 2):
- Your arm is naturally stable
- Less muscle activation required
- Can hold steady for much longer
- Natural resting position for your arm
Your setup should be in a position your body can hold effortlessly, not one that requires constant muscle tension.
Backswing Mechanics
The backswing is critical. If you don't have room for a smooth, controlled backswing, you'll rush it or shorten it, causing inconsistency.
Position 1 (extended):
- You're already extended toward the board
- Pulling back means traveling a long distance from extended position to your head
- Long backswing path = more variance and points of failure
- Either results in jerky abbreviated motion or excessive movement
Position 2 (compact):
- Arm is already in the loaded position
- Minimal backswing needed - just a short pull before release
- Short backswing = less variance, more consistency
- Natural, controlled motion
Pro darts players all have short, controlled backswings because they start from a compact position. The arm is already loaded - they're not pulling from an extended position all the way back.
The Visual Aiming Trap
Here's why Position 1 feels so natural but works so poorly: it encourages visual aiming.
What Position 1 Players Do
- Raise to extended position
- Try to line up dart tip with target visually
- Adjust hand angle, dart position, trying to get the "line" right
- Eventually throw, hoping the visual alignment was correct
This seems logical. It's wrong.
Why? Because your eyes are lying to you. The dart tip being visually aligned with the target doesn't mean your arm structure is pointed correctly.
Example:
- Your body is aimed slightly left
- You "line up" the dart tip by angling your wrist right
- Visually looks good
- But now your throw path is crooked (body goes left, wrist compensates right)
- Result: inconsistent, you have to perfectly time the wrist angle every throw
What Position 2 Players Do
- Raise to compact position while looking at target (body aligns naturally)
- Pause in Position 2 setup
- Can't visually "line up dart tip" because it's too close to see clearly
- Forced to trust that the slow raise aligned your body
- Throw
This feels weird at first. It works.
Why? Because you're using body alignment (which happens automatically during the raise) instead of visual alignment (which requires manual adjustment and compensation).
Position 2 forces you to aim before you setup (correct), not from setup position (wrong).
Real-World Test: My Breakthrough
I threw Position 1 style. Extended arm, trying to "line up" the dart, adjusting my hand position to aim.
I switched to Position 2 (compact setup, elbow bent) and within 5 minutes hit a 180.
Not 5 days. Not 5 hours. 5 minutes.
Why? Because I went from:
- Long lever (error amplification)
- Tiring extended position (fatigue = inconsistency)
- Visual aiming (compensation with wrist/hand)
- Long backswing path (more variance)
To:
- Short lever (error reduction)
- Stable bent-arm position (effortless hold)
- Body alignment (trust the slow raise)
- Short backswing (less variance)
Same player, same darts, same board. Different setup position. Immediate results.
How To Find Your Position 2 Position
Here's how to dial in your compact setup position:
Step 1: Start With 90 Degrees
Stand at the oche. Raise your dart until your elbow is bent at approximately 90 degrees. This is your starting point.
Don't measure it with a protractor - 90 degrees is just a reference. Some players prefer 80 degrees, some prefer 100. The point is bent, not extended.
Step 2: Find Your Eye Level
With your elbow bent, position the dart at eye level. Some players prefer slightly above, some slightly below. Test all three:
- At eye level: Dart is right in your line of sight
- Slightly above: Dart is above your eyeline, you're looking under it
- Slightly below: Dart is below your eyeline, you're looking over it
Throw 10 darts from each position. Which feels most stable and natural?
Step 3: Check Your Elbow Lock
Your elbow should be locked in the same position for every throw. The Position 2 setup makes this easier because:
- Bent arm position has a natural "resting point"
- You can feel when your elbow is in the right place
- Extended position has no natural reference point
Mark where your elbow is (mentally or physically). Every setup should put your elbow in that exact spot.
Step 4: Confirm Backswing Room
From your Position 2 position, pull your hand back toward your face in a straight line. You should have at least 4-6 inches of room to pull back smoothly.
If you don't have room, your Position 2 position is too far back. Move it forward slightly.
If you have way too much room (like 12+ inches), you might be too extended (not compact enough). Pull your setup position back slightly.
Sweet spot: Enough room for controlled backswing, not so much that you're starting too far back.
Step 5: The Stability Test
Hold your Position 2 position for 30 seconds. It should feel effortless. If your arm is shaking, getting tired, or feeling strained, adjust:
- Too high = lower it
- Too extended = bring it in (more bent elbow)
- Too low = raise it
Your Position 2 position should be a position you can hold all day without fatigue.
Common Mistakes When Switching to Position 2
Mistake 1: Not Committing
Players try Position 2 for 3 throws, don't hit treble 20 immediately, and go back to Position 1.
Reality: Your brain has thousands of reps calibrated to Position 1. Switching to Position 2 requires recalibration. Give it at least 50-100 throws before judging.
I got lucky hitting a 180 in 5 minutes, but I already had motor patterns from throwing darts. Your brain might take longer to recalibrate.
Commit for at least one full session.
Mistake 2: Position 1.5 (Halfway Position)
Players "kind of" bend their elbow but still extend pretty far. This is the worst of both worlds:
- Not compact enough for stability
- Not extended enough for visual aiming
- Stuck in between, getting neither benefit
Go full Position 2. Elbow bent at ~90 degrees, dart close to your body.
Mistake 3: Raising Fast and Pausing Long
Players rush to Position 2, then pause for 5 seconds trying to "aim."
Wrong order.
Correct: Slow raise (this is the aiming phase) → brief pause (lock in) → throw
The slow raise aligns your body. The pause confirms it. Rushing the raise and pausing forever defeats the purpose.
Mistake 4: Still Trying to "Line Up" the Dart
Players move to Position 2 but still try to visually line up the dart tip by adjusting their hand angle or wrist.
That's Position 1 thinking in a Position 2 position.
Position 2 works because you can't easily line up the dart tip - it forces you to trust body alignment. If you're still adjusting and "aiming" from Position 2, you didn't make the mental switch.
Stop adjusting. Trust the slow raise. Execute.
Why Pros Use Compact Setups
Watch any professional dart player. Phil Taylor, Michael van Gerwen, Peter Wright, Gary Anderson - they all use compact setups.
None of them use Position 1 extended positions.
Why? Because they figured out through tens of thousands of hours of practice that compact setups are mechanically superior:
- More consistent
- Less fatigue
- Better control
- Tighter groupings
- Easier to maintain form under pressure
They're not doing it for style. They're doing it because it works.
You can learn this in 5 minutes instead of 10,000 hours by just copying what works.
The Bottom Line
Your setup position (where you pause before throwing) is the foundation of your entire throw.
Position 1 (extended):
- Long lever = error amplification
- Tiring position = fatigue
- Encourages visual aiming = compensation
- Long backswing required = more variance
- Result: Inconsistent
Position 2 (compact):
- Short lever = error reduction
- Stable position = no fatigue
- Forces body alignment = trust
- Backswing room = controlled tempo
- Result: Consistent
Find your Position 2 position. Commit to it for at least 100 throws. Let your brain recalibrate.
You might hit a 180 in 5 minutes like I did. Or it might take a few sessions. Either way, you'll end up way more consistent than Position 1 ever allowed.
Related Guides
Why pause position matters so much:
- Why The Pause Matters - Confirmation checkpoint at your setup position
How to change your setup if needed:
- How To Actually Break Bad Dart Habits - Route-arounds to bypass old patterns
- Why Pros Have 'Weird' Setups - Engineered solutions to force new patterns
Understanding the aiming process:
- Aim Before You Setup - Body aligns during raise, not at pause